Solar Street Light Troubleshooting and Maintenance Guide
Jul 06, 2020
Read:3126
Solar street lights are designed for long-term outdoor use, but poor configuration, wiring issues, dust on the solar panel, battery aging, controller faults, or extreme weather can still cause lighting problems. This troubleshooting and maintenance guide explains common solar street light faults, controller indicator meanings, inspection steps, and preventive maintenance methods for road, park, parking lot, campus, and municipal lighting projects.
For project buyers and installers, the goal is not only to repair one failed light. A better approach is to identify the cause, record the site condition, and adjust the configuration when necessary so the solar panel, battery, LED fixture, and controller can work together reliably.
Quick Troubleshooting Table
Use this table as a first inspection checklist before replacing parts. In many cases, the problem comes from wiring, settings, shade, or battery capacity rather than the LED fixture itself.
| Problem | Possible Cause | What to Check | Suggested Action |
| Light does not turn on at night | Low battery, controller setting, wiring issue, or LED fault | Battery voltage, controller indicator, cable connection, LED output | Recharge the battery, reset the controller, inspect wiring, or test the LED fixture |
| Light turns off too early | Battery capacity is insufficient or lighting mode is too demanding | Battery health, working hours, rainy-day backup, dimming schedule | Adjust the lighting mode or increase battery and solar panel configuration |
| Solar panel is not charging | Dust, shade, wrong panel direction, loose connector, or controller issue | Panel surface, sunlight exposure, panel angle, cable connector | Clean the panel, remove shade, adjust orientation, and reconnect cables |
| LED flickers or brightness is unstable | Driver fault, loose wiring, unstable battery voltage, or water ingress | LED driver, waterproof connector, controller output, battery status | Tighten wiring, dry and seal connectors, test driver, or replace failed parts |
| Several lights fail in the same project | Configuration mismatch, poor installation, extreme weather, or batch setting error | Road width, pole height, spacing, local sunlight, battery backup days | Review project configuration and ask for engineering support before replacing all units |
Solar Street Light Controller Indicator Meanings
The controller is the central part that manages charging, discharging, lighting mode, and battery protection. Indicator lights may vary by controller model, but the following meanings are commonly used for solar street light systems.
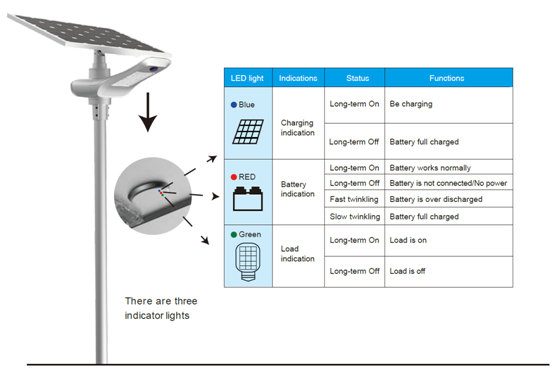
| Battery Indicator | Charging Indicator | Discharge Indicator | Possible Status |
| On | Off | Off | Waiting for discharge or light delay mode |
| On | Off | On | Normal discharging and lighting |
| On | Slow flash | Off | Charging from solar panel |
| Off | Quick flash | Off | Battery over-discharge protection |
| On | Quick flash | Flash | Battery over-discharge while charging |
| On | Off | Slow flash or quick flash | Load missing, load short circuit, or controller protection status |
Daily Maintenance Tips for Solar Street Lights
- Do not throw stones or hard objects at the lamp, solar panel, or battery housing.
- Do not change the lighting mode without checking whether the battery and solar panel can support the new working hours.
- Clean the solar panel surface regularly, especially in dusty roads, industrial areas, coastal regions, and dry-season project sites.
- Check whether trees, buildings, billboards, or new structures create shade on the solar panel.
- Inspect waterproof connectors, screws, pole stability, and cable routing after storms or heavy rain.
Recommended Maintenance Schedule
| Time | Inspection Items | Why It Matters |
| Every 3 to 6 months | Clean solar panels and remove dust, leaves, bird droppings, or other cover | A dirty panel reduces charging efficiency and shortens lighting time |
| Every 6 to 12 months | Check battery status, cable connections, screws, pole angle, and controller box | Early inspection helps prevent battery aging, loose wiring, and water ingress |
| After storms or heavy rain | Check panel angle, waterproof connectors, pole stability, and controller protection status | Strong wind and rain may affect orientation, sealing, and wiring safety |
| For project sites | Record lighting hours, cloudy-day performance, fault reports, and replacement history | Records help engineers adjust future configuration and reduce repeated failures |
Why Solar Street Lights Do Not Turn On After Sunset
If the light does not turn on after sunset, the first step is to check whether the controller has entered discharge mode. Some controllers include a delay function, so the light may not turn on immediately. If the battery is under-voltage, the controller may also protect the system by stopping discharge.
Common checks include battery voltage, LED fixture condition, solar panel charging status, time control or light control settings, and wiring between the panel, battery, controller, and lamp head.
How to Reduce Solar Street Light Failure in Projects
For road and municipal projects, many failures can be reduced before installation. The key is to match the product configuration with road width, pole height, installation spacing, local sunlight, lighting hours, dimming strategy, and required backup days.
If the project needs fast installation and compact design, all-in-one solar street lights may be suitable. If the road requires flexible solar panel orientation, larger battery capacity, or stronger project customization, split type solar street lights may be a better option.
For a broader explanation of components, types, applications, and selection factors, read the complete solar street light guide.
Solar Street Light Troubleshooting FAQ
Why is my solar street light not turning on at night?
Common causes include low battery voltage, incorrect controller settings, poor charging during the day, loose wiring, LED driver failure, or battery protection mode. Start by checking the controller indicator and battery voltage.
How often should solar street lights be maintained?
For most outdoor projects, a basic inspection every 3 to 6 months is recommended. Sites with heavy dust, coastal humidity, frequent storms, or industrial pollution may need more frequent checks.
What does a flashing controller light mean?
A flashing indicator may show charging, over-discharge protection, load short circuit, or another controller status. Check the controller manual and compare the battery, charging, and discharge indicators together.
Can battery problems cause short lighting time?
Yes. Battery aging, insufficient battery capacity, repeated over-discharge, or a mismatch between battery size and lighting mode can cause the lamp to turn off earlier than expected.
How can project buyers reduce failure rates before installation?
Project buyers should confirm road width, pole height, spacing, local solar radiation, required lighting hours, backup days, and installation environment before selecting the product configuration.
Need Project-Based Solar Lighting Support?
If you are checking solar street light configuration for a road, park, parking lot, campus, or municipal project, RoadSmart can help review lighting hours, pole height, solar panel capacity, battery backup, and product selection.